The bulk of your website changes will likely consist of updating the content of your existing pages. In order to change a page, you will need to find it in the page list, on the right side of the main administration page of your Surreal account. Once you have located the page you wish to edit, click the title to be taken to the editor.
When the editor loads, you will still see the Surreal account tabs at the top of the page, so you can navigate to your account settings or main administration page with a single click. Just below this is your editing Toolbar, which has all the tools you will use to add, remove, or change the content of your web page.
![]()
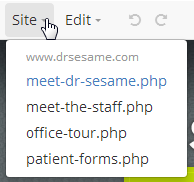
Site
The Site button gives you quick access to your other editable pages. If you wish to jump quickly from one page to another without leaving the page editor, you can click on the Sites button and select the page you wish to view.
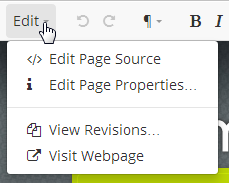
Edit
The Edit button has options for additional editing. If you are familiar with HTML, you can edit the source code of your website directly by using the Edit Page Source option. You can also view revisions made to that particular page, or view the live version of the page on your website. In addition, you can use the Edit Page Properties link to update meta data for the page. See below for more information.
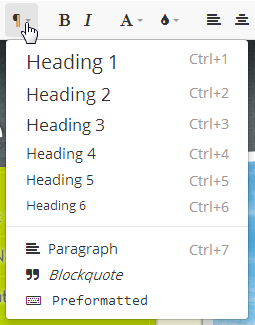
Text styles
Your website design comes with a number of predefined text styles, which you can choose from the drop-down menu located under the pilcrow (or paragraph symbol). These text styles will vary slightly, depending on your site design, but each of the Heading options should provide you with decreasing size and emphasis, and allow you to define sections and sub-sections on your web page. An example of this can be found on the page you are reading now, where the “Toolbar” text at the top of the page is a different Heading style than the style used on “Text styles” just above.
The Paragraph style is generally the normal text of your webpage, and should be used for most of the content that doesn’t require special emphasis. Blockquote and Preformatted are text styles used to provide emphasis for quotations and text that requires specific spacing.
Font
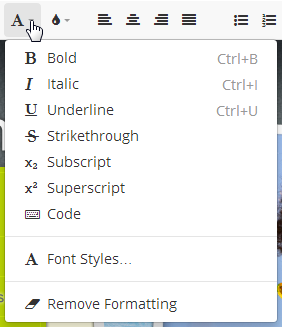
In addition to the predefined text styles, you can also access standard font options, such as those found in most text editors and Word document programs. You can make text stand out using Bold, Italic, or Underline; or add a Strikethrough effect to note where changes or updates have been made.
If you want a section of your web page to appear in a different font face, you can select from the available fonts by clicking on Font Styles. While Remove Formatting will clear any font options or effects you have applied to the highlighted text.
Classes
This drop-down menu lists classes that can be assigned to different elements of your web page. A “class” is a predefined style that can dictate such things as border color, font size, or image position. Depending on the classes defined for your website, you may find options here that will match images you’ve uploaded to the format of images that were added when your site was created. This may also apply to text within specific sections of the page.
Since each website has its own distinct design, it is impossible to list all available options here. The easiest way to determine what each class does is to apply it to an image or a section of text, and view the results. Removing the class is as simple as highlighting the text or image to which it was applied, and unchecking the class from the drop-down.

Alignment and Lists
The Alignment and Lists buttons allow you to align your text left, right, or center; or add lists using either bullet points or numbers/letters.
![]()
![]()
Additional Content
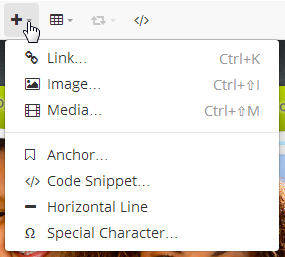
Additional content can be added to your web page using the plus sign (+) button in the toolbar. From the drop-down menu, you can add a hyperlink to another web site or another page on your own site; or you can add a new image or a media file.
Link
To add a hyperlink to your web page, highlight the text you wish to be the link, then click on the plus sign (+) and select Link. You will see a new window open that asks you for the URL. This is the website address for the website or page to which you wish to link. If you check the “Open in a new window” box, this will force your browser to open the link in a new tab, or a new browser window. When you are done, click Submit to save the new link.
Image
To add a new image to your web page, click on the plus sign (+) and select Image. You will see a new window open. The URL for the image is its website address. If you are using an image you have uploaded to your own website, you can get this website address from the File Manager.
Click here to find more information on using the File Manager.
If it is an image from another website, first make sure you have permission to use it; if so, you can simply right-click that image and copy its location. Then paste that location in the URL field here. The image “Description” is text that is displayed in browsers that cannot display images.
It is only necessary to define the “Width” and “Height” of the image if it is too large for your page. Setting the width and height of the image will help to make it uniform with the rest of the images on your site. Alternatively, you can resize the image using the option available.
Media
You can use the Media option to add an audio or video file to your website. Using the “Source” field provided, you can either paste in the website address for the media file you wish to add, or click the folder icon to browse your File Manager for a file you have uploaded.
If you have been provided with the code necessary to embed your media (such as the code provided by YouTube), you can click on the Advanced tab and add that code directly to the “Embed Code” field.
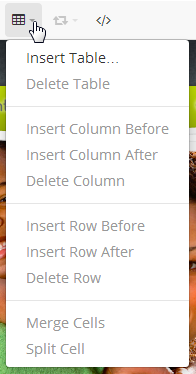
Tables
Using the Tables button, you can add a table to your website. This makes it easier to display information in neatly arranged columns and rows. Once the table has been created, you can insert or remove rows and columns using the options provided in the drop-down menu. If you decide to remove the table altogether, simply select it, then choose Delete Table from the menu.
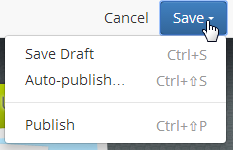
Cancel or Save
If you decide you do not want to keep your web page changes, you can choose to Cancel the revision. You may receive a warning from your browser that lets you know that your changes will not be saved if you navigate away from the page.
If you do want to keep your changes, but are not finished or want to wait and publish the changes at a later time, you can click the arrow on the Save button and choose Save Draft to save your changes without publishing; or Auto-Publish to schedule the page for publication at a later date. This option may be useful if you want to edit a web page in advance of an announcement or a promotion, and make sure the edited page is published on the date the announcement or promotion starts.
You can choose the Publish option if you are finished with your changes, and are satisfied with everything. Once this button has been clicked, your updated page will be published and available for anyone who visits your website.
User accounts in Surreal can have different permissions, and access to different features. If you are logged in to your Surreal account and don’t see all the options described here, please give our Member Services team a call.
 Looking for more information? Check out these Related Pages!
Contact our Member Services team at 866-537-8272, Monday - Friday 6 AM to 4 PM Pacific Time.