In this article:
Introduction
Online Booking & Booking Center
Booking Requests
Add Resources
Add Providers & Bookable Hours
Booking Sources
Special Instructions
Cancellation Policy
Edit Display Name
Edit NPI Number
Manage Provider Calendar Blocks
Booking Slot Interval
Booking Temporary Hold
Reduce Booking Gaps
Saved Schedules
Create a Custom Schedule
Edit A Schedule
Duplicate a Schedule
Delete a Schedule
Use a Schedule
Quick View
Add Special Hours
Delete Special Hours
Custom Special Hours
Partial Special Hours
Create a Custom Booking Source Link
Retrieve a Booking Source Link
Add Online Booking to Your Listings
Retrieve an Embed Code
Add Booking Widget to Business Website
Email Notifications
Display Order
Booking Requests
Booking Statistics
Accept
Flag for Review
Cancel Hold
Add a Note
Reschedule
Delete
Introduction
Online Booking & Booking Center

Welcome to the new face of Online Booking. With Demandforce’s Online Booking system, your business is able to customize and improve the accuracy of the entire booking experience from the time your clients click to request an appointment to placing the booking in the management system. Thanks to the multitude of ways your office can customize the booking experience, our system produces a more accurate and efficient appointment booking workflow for both your business & its patrons. With Online Booking your office can design & manage:
- New & Existing Client Booking Reasons
- Recall-Type Booking Reasons
- General Calendar Blocks (Schedules) & Holiday Closures
- Provider-specific Calendar Blocks
- Most popular Booking Request sources
- Total of new client Booking Requests
- Total of returning client Booking Requests
- Manage Booking Requests
- View Booking Request Details
Booking Requests
With the additions of synced appointment data & Online Booking Settings the resulting appointment requests are much more accurate & easily managed, meaning less time for your office to handle requests. Depending upon how closely your management system works with Online Booking, our system could reduce the guesswork in filling appointment requests, offering a fulfillable request each time.
Overview
Online Booking has 3 main Settings to control the accuracy of the Booking request process for your clients; these include:
- General Settings
- Booking Reasons
- Providers
In the following sections of this article, you will find instructions for navigating these settings to configure Online Booking. The changes that you make within these settings will be reflected within the Booking Request interface from which your clients request appointments (see image in the Booking Request section of this article).
Setup Wizard
If you’d like assistance configuring the Online Booking feature, you can use the Online Booking Setup Wizard in Booking Settings to guide you through creating multiple Booking Reasons at once.
The Online Booking Setup Wizard is designed to take you step-by-step through the creation & configuration of Booking Reasons and highlight a few follow-up tasks that will enhance your office’s use of Online Booking
Note: For clients new to Online Booking, the Online Booking Setup Wizard will automatically initiate upon accessing Booking Settings the first time. You can access the Setup Wizard in Online Booking Settings at any time in the future from the Booking Reason landing page.
To initiate the Setup Wizard:
1. Click Leads on the left-navigation bar.
2. Click Online Booking.
3. Click Booking Settings.
4. Click +Create New at the top-right of the Booking Settings page.
5. Click Multiple Booking Reasons.
6. Follow the on-screen instructions to create & configure multiple Booking Reasons.
7. Once you’ve completed the creation of the Booking Reasons, you will visit the final page/step prompting you to customize your Booking Reasons (image, below).
Click Customize to return to Booking Settings and further define individual Booking Reason configurations; for example, you can:


- Edit Providers & Operatories
- Add a Custom Schedule of Bookable Hours
- Add/Edit Special Instructions
- Add/Edit Cancellation Policy
- Add an Booking Widget to Your Website
For further instruction on completing the individual tasks above, click the linked sections above to navigate to that portion of this article.
Booking Settings
Reasons
Booking Reasons are the appointment types that your client selects when they request a booking with your office (Booking Request interface, image below).
To access Booking Reasons, click Leads on the blue navigation bar, then open the Online Booking drop-down, and click Booking Settings.
Create Booking Reasons
General Info
a. Type a Name for the Booking Reason.

- Select the applicable recall procedure in the field that appears upon clicking Recall.
Booking Rules

Advanced Booking
To configure this setting:
b. Enter the number of business days in advance an appointment must be requested.
c. To save changes & close Booking Reason Settings, click Save.
Duration
a. Click Edit to the right of a Booking Reason.
Note: You can adjust the time needed for a Booking Reason when you set up the available providers for that Reason; this can include prep/clean-up time for which the client does not need to be present. See Add Resources for additional information.
Resources
Add Resources (Operatories)
a. Click +Add Operatory.
b. Click the checkbox next to the appropriate Operatories. You can add more than one Operatory at once to a Booking Reason.
c. Click Add.
d. The Operatories will appear in the Resource panel with the addition of an +Add Providers button.
Note: If our system does not sync operatories/stations from your management system, the default option in the Resources section will be Providers. In this case, skip "Add Resources (Operatories), and continue on to "Add Providers & Bookable Hours," in the section below.
Add Providers & Bookable Hours

a. Under Add Resources, click +Add Provider(s).
b. Select the available providers from the list.
c. Click Continue.
d. Select to keep the duration of the appointment the same as the Booking Reason.
Note: To adjust the appointment duration to compensate for pre/post-appointment procedures:

- Click the drop-down menu in the Edit Duration section of the Add Providers window.
- Click Custom.
- Type the number of minutes in the field provided.
- Click Continue.

- If the Providers' schedules vary, click Cancel, and click +Add Providers. Select only one Provider to add, and apply their specific calendar of Bookable Hours, individually. Continue this process by clicking +Add Providers under the desired Operatory and adding the Provider + Bookable Hours for each individual with a different working schedule.
- Repeat the steps above for each Operatory & Provider.
Booking Sources
In Booking Sources, designate per provider on which online listings and communications, you'd like the Booking Reason to be available.

To configure this setting:
a. Open and Booking Reasons, and find the name of the Provider in the list under Booking Sources.
b. To the right of the Provider's name, click the checkbox under each Booking Source (ex: Yelp, Google, Demandforce Local, etc.) on which the Booking Reason should be available.
c. Continue editing the Booking Reasons, and click Save at the bottom-right corner when you've completed your changes.
Note: If you do not check the boxes in Booking Sources, the Booking Reason will not surface for the Provider on the Online Booking request page connected to that directory/communication.
Special Instructions

a. Click Edit to open a Booking Reason.
b. Find the Special Instructions section, and type the desired text in the field provided.
c. Continue editing the Booking Reason, or click Save at the bottom of the screen to close the Booking Reason.
Cancellation Policy

a. Click Edit to open a Booking Reason.
b. Find the Cancellation Policy section at the bottom of the Booking Reason settings.
c. Type the desired text in the provided field.
d. Continue editing the Booking Reason, or click Save at the bottom of the screen to close the Booking Reason.
Providers

- Edit a Provider’s display name
- Add/Edit a Provider’s NPI number
- Manage Provider-specific Calendar Blocks
Note: If a Provider for which your office schedules appointments is not listed on the Providers tab, or if there are inactive/unused Providers listed that you’d like removed, please contact support for assistance.
Edit Display Name
1. Click to open the Providers tab in Booking Settings.
2. Click Edit to the right of the Provider's name.
Edit NPI Number
2. Click Edit to the right of the Provider's name.
3. In General Info (of the window that appears), click the NPI Number field, and type the National Provider Identification number.
Manage Provider Calendar Blocks
Provider calendar blockers can be used to remove availability for a specific provider from the Online Booking calendar based on a date or series of dates. The calendar blocks can be consecutive or nonconsecutive. Provider calendar blockers are best used for non-recurring days off. Weekly/recurring schedule variations can be configured under Saved Schedules in General Settings.
1. Click to open the Providers tab in Booking Settings.
2. Click Edit to the right of the Provider.
3. Click Availability at the top of the window.
5. Configure the Start Date and the End Date by clicking the Select date fields and selecting the date from the calendar.
7. Click Save.
General Settings
Universal settings like working schedules & holiday closures are configured on the General Settings page of Online Booking. Click the gear symbol at the top-right corner of Online Booking Settings to navigate to General Settings. The following features can be configured in General Settings:
- Booking Slot Interval
- Booking Temporary Hold
- Reduce Booking Gaps
- Saved Schedules
- Special Hours (holidays/closures)
- Booking Source Links
- Create a Custom Booking Source Link
- Retrieve an Existing Link
- Booking Widget Embed Code
- Email Notifications
- Display Order
Booking Slot Interval
- Under Booking Slot Interval, click the dropdown menu.
- Select to display slots every 30 minutes or 60 minutes.
- If you’ve completed your changes, click Save to exit.
Booking Temporary Hold

1. Type the number of business hours (1 to 24) that you’d like a request to be held from the Booking calendar.
- Locate the Booking Request in the Booking Center
- Open the Booking Request Details.
- Click the action dropdown menu.
- Click Cancel Hold.
- Confirm the hold cancellation.
Reduce Booking Gaps
Once you’ve completed configuring the Online Booking Calendar, you may preview the Booking Request Calendar and see irregular or uneven booking slots that don’t fit your typical scheduling workflow. If your office finds that these slots do not fit, and you’d like to eliminate these times, then uncheck the box below Reduce Booking Gaps to shift available time slots to the closest hour or half hour.
Note: Disabling the Reduce Booking Gaps setting may result in a slight reduction of available time slots on the Booking Calendar. Test Online Booking both with and without this setting configured in order to find the configuration that best suits your needs.
To enable/disable the Reduce Booking Gaps setting:
- Navigate to Online Booking General Settings.
- Check (to enable)/Uncheck (to disable) the box below Reduce Booking Gaps in the General Booking Configuration section of General Settings.
- If you’ve completed your changes, click Save at the bottom of the page.
Saved Schedules

Saved Schedules are key in determining when a provider is available for scheduling. Under Saved Schedules in General Settings, one should create schedules for regular business hours and/or providers’ working hours (should they vary from regular office hours).
Schedules created here will be applied to a Booking Reason until removed or edited. Saved Schedules can be implemented to control/reduce the quantity of available time slots presented each week on the booking calendar.
Create a Custom Schedule
To create a new weekly schedule:
- Click the
plus symbol at the top-right corner of Saved Schedules.
- Type a Name for the schedule in the New Custom Schedule Name field.
Note: You can add multiple hour ranges for (a) specific day(s).
-
To add the hours to each day, click the days of the week to which the hours apply.
- Then, click Apply.
- Continue this process until you’ve entered all available hours for the office/provider.
- Click Done to save the schedule and exit the Custom Schedule panel.

Note: You can edit this schedule in the future from General Settings > Saved Schedules. You can also create a custom schedule while building a Booking Reason.
Edit A Schedule
1. Click the
2. Make the desired edits.
3. Once you’ve completed editing the schedule, click Done.
Duplicate a Schedule
1. Click the
2. Type the name of the new schedule in the New Copy field of the Duplicate Schedule window.
3. Continue to make edits to the duplicated schedule, or if you’ve completed your work, click Done to close the window.
Note: A duplicated schedule is not automatically attached to Booking Reasons that are connected with the original schedule. The duplicated schedule must be attached to a Booking Reason in order to be used by navigating to Booking Reason Settings, clicking Edit, and scrolling to the Resources section to configure provider/operatory schedules.
Delete a Schedule
1. Click the
2. If the schedule is being used with any active Booking Reasons, select a schedule to replace it from the dropdown list.
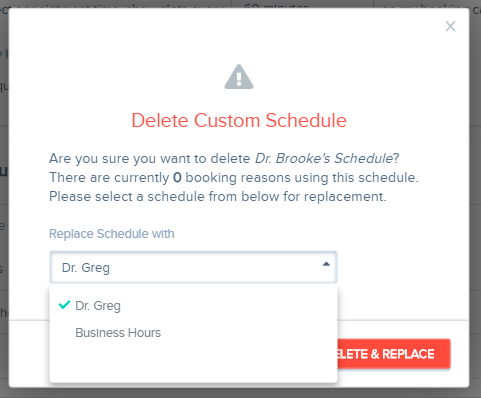
3. Click Delete & Replace.
Use a Schedule
To apply a schedule to a Booking Reason, follow the instructions in the Add Resources section of this article. Saved Schedules are applied to a provider when adding them as a Resource to a Booking Reason. During this step, you are asked to Edit Bookable Hours for the Provider (see image below).
Quick View
1. Click the
2. Click Done to close the window.
Special Hours
The Special Hours section of General Settings is reserved for national holidays and annually recurring office closures. We’ve included a few standard closures, but you can create your own custom calendar blocks for annual/recurring events. Keep in mind that a Special Hours calendar block removes availability for all Providers & Booking Reasons on the selected dates.
Add Special Hours
1. Click the
2. Under the dropdown menu under Date Name* click the applicable date from the options, or select Custom to create your own.
3. Click the “Make this occur annually” checkbox if applicable.
4. Click Add Date.
Delete Special Hours
Deleting Special Hours, will remove that closure/calendar block from the booking calendar. To delete Special Hours:
2. Click Delete to confirm the change.
3. Continue editing settings, or click Save at the bottom of the page to close General Settings.
Custom Special Hours
1. Click the
2. Click to open the dropdown menu under Date Name*.
3. Scroll through the list, and click Custom Date.
5. Enter a Date Selection by clicking the appropriate field, and typing in a start & end date in MM/DD/YYYY format.
7. Click Add Date.
Partial Special Hours
1. Click the checkbox next to No Bookings All Day to the right of the Special Hour closure.
3. Click Save at the bottom of the screen once you’ve completed your changes.
Custom Booking Sources
- Retrieve a link to the Online Booking feature to be used with “Book Online” Call-to-Action (CTA) buttons on sites like:
- Yelp
- Create your own custom links for additional web pages, directories, and/or listings with “Book Online” functionality and CTA buttons.
- Retrieve an embed code to place the Online Booking widget on your business website.
Create a Custom Booking Source Link
1. Click the
2. Scroll to Custom Booking Sources.
3. Click the
4. Type a recognizable Website Name in the field provided.
7. A Get Embed Code and Get Link button will be available to the right of the newly added Custom Booking Source.
8. Continue making edits to General Settings, or click Save at the bottom of the page.
Retrieve a Booking Source Link
1. Click the
2. Scroll to the Booking Source Link section.
3. Click Get Link next to the listing of your choice.
Add Online Booking to Your Listings
A Facebook CTA(Call-to-Action) button "Book Now" is illustrated in the image below. When the client clicks Book Now, they will be directed to the Online Booking Request page.
Use the instructions in the previous section of this article- "Retrieve a Booking Source Link" + the corresponding listing's instructions (below) to accomplish this task.
- Facebook: "How do I add a call-to-action button to my Facebook page?"
- Yelp : "How to Put Your Booking Link on Your Yelp Business Listing"
- Google: "Add Links to Your Google My Business Profile"
- Sign in to your Google My Business Account.
- From the My Business account page, click Info on the left-navigation panel.
- Click the pencil icon to edit the Appointments field.
- Paste the link from the Google Custom Booking Source in the window.
- Click Apply.
- Your Custom Booking Source link will appear next to Appointments on your Google My Business profile & listing (image below).
Booking Widget Embed Code
Retrieve an embed code:
2. Scroll to Custom Booking Sources.
3. Click the Get Embed Code button to the right of the Custom Site for which you’d like to generate the code.
Add Booking Widget to Business Webpage
- Squarespace: "Adding custom code to your site."
- Wix: "Embedding Custom Code to Your Site."
- Weebly: "Add External Content and Widgets with Embedded Code."
1. Locate the embed code under Custom Booking Sources in General Settings.
2. Click Copy Code.
3. In your website builder/editor, add a new module/section to your site.
4. Select the type of module/section to add (here, it is an "editable module;" it may also appear as an embed or custom code module).
5.Name the module/component, if applicable.
Note: For some web editors/builders, you may be able to paste the copied embed code upon creating a new module instead of creating, saving, and then editing a module. In this case, proceed with copying & pasting the embed code from General Settings when you create the new webpage module. In these instructions, we assume that you must first add and then access the new module to edit & apply the embed code.
8. Click the < > icon (or similar function/button) to access HTML-editing mode.
9. Erase any existing code, if necessary.
10. Paste the embed code in the space/field.
11. Click the < > icon to exit HTML-editing mode.
12. Save your changes, if applicable.
Email Notifications
- The details of their requested Booking.
- The Booking Request has been accepted.
- The Booking Request has been rescheduled.
- The appointment has been booked in the management system.
1. Click the
2. Scroll to the Email Notifications section.
3. Toggle On/Off the desired communication(s).
4. Continue making edits, or click Save at the bottom of the page.
Display Order
Booking Reasons that are turned off will show up in Display Order but will not appear in the Online Booking request flow. Keep in mind that Booking Reasons designated for New and Returning clients only populate for the respective flow. If a client selects that they are a new client on the first step of the flow, then they will not see Booking Reasons designated solely for returning clients.
Booking Center
- Analyze your booking request statistics
- Manage booking requests
- Accept, Reschedule, Flag for Review, Delete
Booking Center Data
Located at the top of the Booking Center are your booking statistics. In this area, you will find graphical illustrations of your booking request demographics. Further down the page, are all of the booking requests submitted through Online Booking. Read the following sections for brief explanations of the data displayed in the Booking Center.
Booking Requests
Each time a client requests an appointment, the booking request will be displayed in the Booking Center. Your office will manage your requests from the Booking Center. Further instructions for managing appointment requests are in the Managing Booking Requests section of this article. Here, we will cover details of the information listed within your Booking Request.
Booking Statistics
- Total number of Booking Requests
- Distribution of new & returning booking requests
- Booking Sources
- Distribution of Booking Requests from each source
2. Select a period of time from the drop-down menu, or click Custom Range, and type a period time in the spaces provided.
To sort & filter the Booking Requests under All Bookings:
1. Click the
2. Select the filter options from the drop-down menu.
4. Click Clear to remove filter options.
You can download your Booking Requests as a CSV file:
1. Click the
2. Your file will be downloaded to your browser window, momentarily.
Manage Booking Requests
There are multiple ways to manage Booking Requests found in the Booking Center. In the following sections, you will find instructions for each action that can be used to manage a Booking Request.
Accept
To accept a Booking Request:
2. Click Accept.
Flag for Review
You can flag a Booking Request for review. This is useful when many users are managing Booking Requests, and you’d like to indicate that the office is waiting on response or confirmation from the requester. Request flags are only visible internally only among Online Booking users.
1. From the Booking Center, click the
2. Click to open the drop-down menu at the bottom-left of the request detail.
3. Click Flag for Review. Your changes will appear momentarily after an on-screen confirmation.
Note: You can leave a note on the Booking Request using the instructions in the following section.
Cancel Hold
You can check the status of the Booking Temporary Hold from within the Booking Center in the Booking Information section of a request. To find the hold status for a request.
1. Navigate to the Booking Center.
2. Locate the Booking Request you'd like to check.
3. Click the caret symbol to open Booking Information.
4. Find the Hold Status to the right of Hold under Booking Information.
If a client contacts your office to cancel a Booking Request, you should cancel the Booking Temporary Hold to make the requested (held) time slot available on the Booking Calendar. You can perform this action from the Booking Center. To cancel a Booking Temporary Hold:
1. From the Booking Center, click the caret symbol to the right of the requested appointment to open the Booking Information.
2. Click to open the action drop-down menu at the bottom left of the request detail.
3. Click Cancel Hold.
4. Confirm the action by clicking Cancel Hold.
Note: Should you delete or reschedule an appointment request in the Booking Center, the Booking Temporary Hold will be cancelled automatically.
Add a Note
If you’ve flagged a Booking Request for review, you may also want to leave a note with further detail regarding the flag. You can add internal notes to a Booking Request using the +ADD NOTE feature in Booking Information. Notes are not visible to the client.
1. From the Booking Center, click the
2. Click +ADD NOTE to the right of the Booking Information.
3. Type your note in the field provided.
4. Click Save.
Reschedule
To Reschedule a Booking Request:
1. From the Booking Center, click the
2. Click to open the drop-down menu at the bottom-left of the request detail.
3. Click Reschedule.
4. In the window that appears, select a New Date* for the appointment from the calendar.
5. Type the New Time* for the rescheduled appointment in HH:MM format.
6. Select AM or PM from the drop-down menu.
7. Type additional Comments for the client in the field provided.
8. Click Send. Your changes will appear momentarily after an on-screen confirmation.

Delete
If a Booking Request is invalid, you can delete the request from the Booking Center.
To delete a Booking Request:
2. Click to open the drop-down menu at the bottom-left of the request detail.
3. Click Delete.
4. Click Delete to confirm your changes in the dialogue box that appears.