Microsoft Outlook 2013/365
- Open Outlook on the PC on which you wish to receive your email.
- Open the File menu and click Account Settings.
- Click New
- Check “Manual setup or additional server types” and click Next.
- Ensure that “POP or IMAP” is checked and click Next.
- Under User Information, enter the name you want associated with the account in the Your Name box.
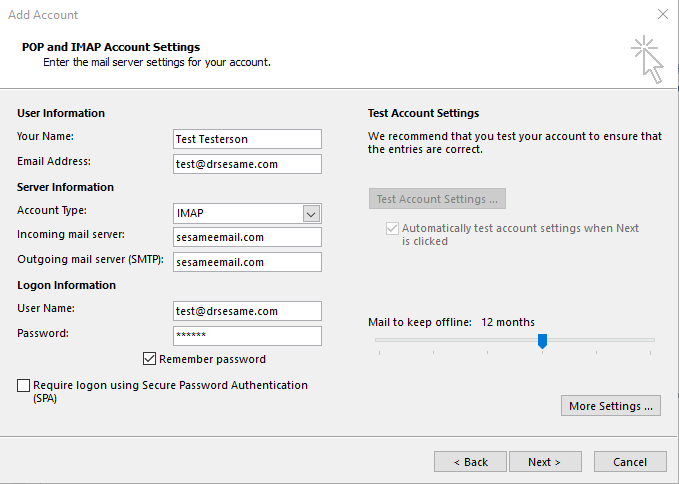
- In the E-mail Address box, type the email address.
- Select POP3 or IMAP as the Account Type.
- Under Server Information in the Incoming Mail Server box, type sesameemail.com.
- In the Outgoing mail server (SMTP) box, type sesameemail.com
- Under Login Information, enter the email address in the User Name box.
- If you want the system to remember your password, type your password in the Password box, and check the Remember password box.
- Click More Settings…
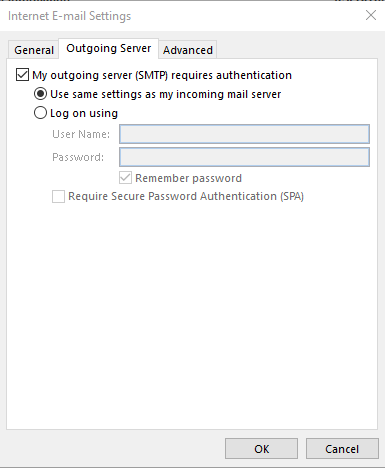
- Select the Outgoing Server tab.
- Check the My outgoing server (SMTP) requires authentication box.
- Choose the Use same settings as my incoming mail server option.
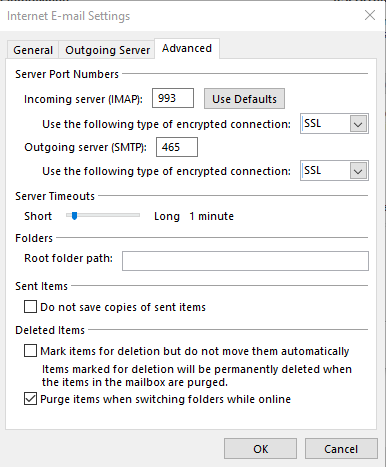
- Select the Advanced tab.
- Select SSL for Use the following type of encrypted connection: under Incoming and Outgoing servers
- Ensure that the Incoming server port is 993 (for IMAP) or 995 (for POP)
- Ensure that the Outgoing server port is 465 and click OK
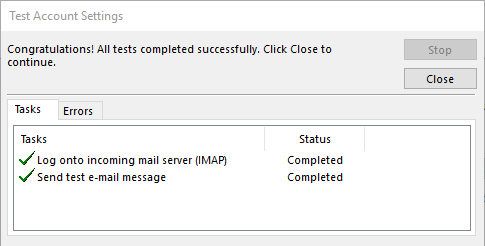
- Click Next to begin the test process and verify that green checkmarks display for all the listed tasks. Click Close.
- Click Finish.
Microsoft Outlook 2007/2010
- Open Outlook on the PC on which you wish to receive your email.
- Open the Tools menu and click Account Settings.
For Outlook 2010, click on File, then Account Settings. - Click New, then Next.
- Check “Manually configure server settings or additional server types” and click Next.
- Ensure that “Internet E-mail” is checked and click Next.
- Under User Information, enter the name you want associated with the account in the Your Name box.

- In the E-mail Address box, type the email address.
- Select POP3 as the Account Type.
- Under Server Information in the Incoming Mail Server (POP3) box, type sesameemail.com.
- In the Outgoing mail server (SMTP) box, type sesameemail.com
- Under Login Information, enter the email address in the User Name box.
- If you want the system to remember your password, type your password in the Password box, and check the Remember password box.
- Click More Settings…
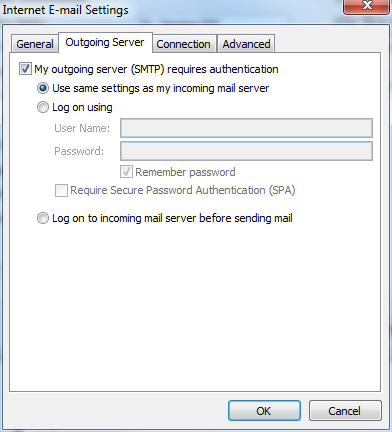
- Select the Outgoing Server tab.
- Check the My outgoing server (SMTP) requires authentication box.
- Choose the Use same settings as my incoming mail server option.
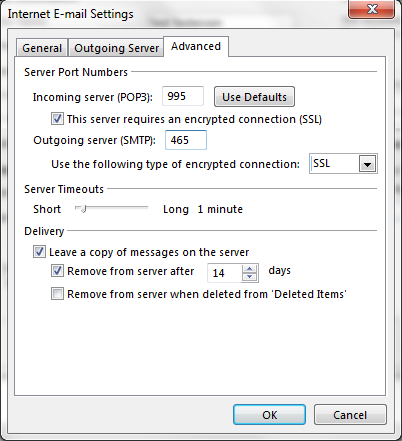
- Click on Advanced and verify that SSL is checked for both Incoming and Outgoing servers.
- Click Test Account Settings and verify that green checkmarks display for all the listed tasks. Click Close.
- Click Next and then click Finish.
Microsoft Outlook 2003
- Open Outlook on the PC on which you wish to receive your email.
- Open the Tools menu and click E-mail Accounts.
- Choose the Add new e-mail account option in the E-mail Account Wizard and click Next.
- Choose POP3 option and click Next. This will allow you to connect to a POP3 email server to download your email.
- On the E-mail Accounts Applet under User Information, enter the name you want associated with the account in the Your Name box.
- In the E-mail Address box, type the email address.
- Under Server Information in the Incoming Mail Server (POP3) box, type sesamemail.com.
- In the Outgoing mail server (SMTP) box, type sesameemail.com.
- Under Login Information, enter the full email address in the User Name box.
- If you want the system to remember your password, type your password in the Password box, and check the Remember password box.
- Click More Settings … to open the Internet E-mail Settings Applet.
- Select the Outgoing Server tab.
- Check the My outgoing server (SMTP) requires authentication box.
- Choose the Use same settings as my incoming mail server option.
- Click on Advanced and verify that SSL is checked for both Incoming and Outgoing servers. Click OK
- Click Test Account Settings and verify that green checkmarks display for all the listed tasks. Click Close.
- Click Next and then click Finish.
Microsoft Outlook 2002 & Outlook Express
- Open Outlook on the PC on which you wish to receive your email.
- Open the Tools menu and click Accounts.
- Click Add and then click Mail.
- Type a name you want associated with the account and click Next.
- Type the email address of the account and click Next.
- For incoming mail (POP3) server, type sesamemail.com
- For Outgoing mail (SMTP) server, type sesameemail.com and click Next.
- Type the email address and password in the corresponding fields. If you would like the system to remember your password, check the Remember password box and click Next.
- You will be asked to choose the method used to connect to the Internet. Select the method used at your location and click Next.
- Click Finish.
- The Internet Accounts window should still be open. Highlight the account you just created and click Properties.
- Click on the Servers tab.
- For Outgoing Mail Server, check the box that reads My server requires authentication.
- Click Settings.
- Choose the Use same settings as my incoming mail server option and click OK.
- Click OK in the Properties window.
- Click Close in the Internet Account window.
 Looking for more information? Check out these Related Pages!
Our Member Services team is available Monday through Friday, from 6:00 AM until 5:00 PM Pacific. You can reach us Toll Free at 866 537-8272 (outside of North America, dial +1 206 458-7700) - or use our Contact Form to send us an email.